-
Image
Image of an empty billboard. Photo by Jose Enrique. CC BY NC ND 2.0 License. Photo: Jose Enrique. CC BY NC ND 2.0 License -
Image
Image of a flyer. Photo: Cualquierchica. CC BY-NC-ND 2.0 License -
Image
Image from a Xarxanet webinar. Photo: Associació per a Joves TEB -
Image

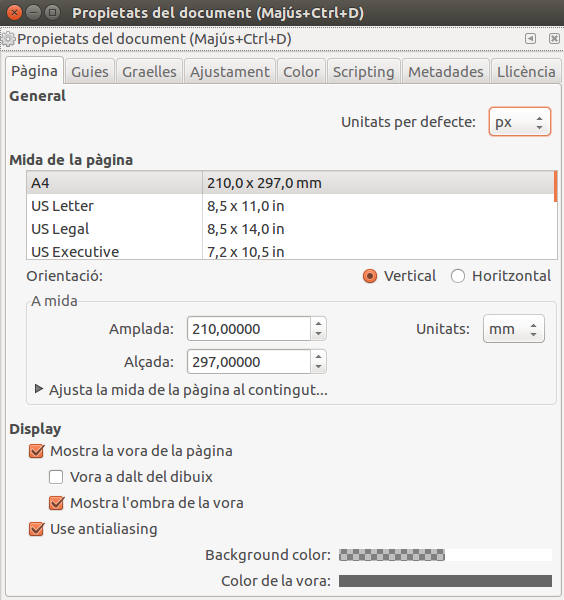
Image explaining the Inkscape guides. Photo: Roger-Rognu -
Image
Inkscape logo. Photo: Inkscape -
Image

Canva logo. Photo: Canva
Advertising has changed hugely with the new tools and social media. Here we give some advice to make a poster using different digital formats.
Design has changed a big deal with the emergence of digital tools. The many tools available, the digital formats to save your work and the social media to disseminate your activities have changed the rules of the game. Today, you no longer have to plaster your municipal billboard with posters. You can also post on Facebook, Twitter and Instagram.
Here we give you a few indications and resources to make your posters using Inkscape and Canva, so you can post them in different places.
1. Paper or digital format?
If you take a look at your local billboard, for sure you’ll see there are far fewer posters than 15 years ago. Yes, the reason being is the digital format and many platforms where you can disseminate your activities. Now you have social media, banners and many other ways of getting your activities out to your target audience.
Nevertheless, it is very important for you to identify your target audience, for whom you organise your activities. Is this audience using the social media? Do they visit your website? Or is it a more analogical audience that will take more notice of a poster or flyer?
You must carefully consider all answers, since the success of attendance to your activities will largely depend on how you advertise them. With these answers you’ll be able to decide whether you should advertise using the digital or paper format.
2. Sketch your idea for a poster.
A poster or advertisement always starts with a sketch. This draft allows you to reflect your creative idea, the elements in it, the explanatory texts with information on your activity, and the colours you’ll use for your poster.
To sort out these ideas, you may consider using Autodraw by Google. This tool will help you to create a sketch in just a few minutes. Through a Machine-learning algorithm, this tool will interpret your freehand drawing and will provide you with interpretations. Then, automatically, you can include these interpretations in your document. Once you’ve incorporated all the interpretations you will have created your sketch.
3. Sizes and resolutions for paper and digital formats.
Although very often the rules of calls for posters establish that the size of a poster should be 50 centimetres wide by 70 centimetres tall, the truth is that your poster can be of any size. You just have to think were you’re going to hang it. Find out what the sizes are of your local billboards, the windows in your local shops or the doors.
You should also take digital formats into account. A banner is not the same as a post on Facebook, Twitter or Instagram. Also, you must remember that these sizes are constantly changing.
This chart explains some possible sizes for your posters
|
Type |
Support/media |
Size |
Resolution & colour. |
|
Large printed poster. |
Billboard, door or large shop window. |
50 centimetres by 70 centimetres. Vertical position. |
300 DPI for offset printing & 150 DPI for digital. Colour CMYK. |
|
Small printed poster. |
Billboard, door or shop window. |
29.7 centimetres by 42 centimetres. DIN A3. |
300 DPI for offset printing & 150 DPI for digital. Colour CMYK. |
|
Flyer format 1 |
Handout. |
14.8 centimetres by 11 centimetres. DIN A6. |
300 DPI for offset printing & 150 DPI for digital. Colour CMYK. |
|
Flyer format 2 |
Handout. |
21 centimetres by 15 centimetres. DIN A5. |
300 DPI for offset printing & 150 DPI for digital. Colour CMYK. |
|
Publication image. |
|
1024 pixels wide by 512 pixels tall. |
150 DPI. Colour RGB or CMYK. |
|
Publication image. |
|
800 pixels wide by 800 pixels tall. |
150 DPI. Colour RGB or CMYK. |
|
Publication image. |
|
800 pixels wide by 800 pixels tall. |
100 DPI. Colour RGB or CMYK. |
To change these settings, you can do the following: on Inkscape go to File and then Document Properties. There you will find several tabs referring to the Page Size, Layout and Colour. At the Page tab, under the Size section, you can change anything related to the size of your poster. If you want to print it at a press, we advise that you add a 2 cm margin at each side. You can do this by selecting Adjust page size to content.
Under the Colour tab you can establish if you want the colour to be RGB or any other system. If you’re going to print the poster or flyers, check if you can use a digital print or an off-set ink print. If you need an off-set ink print, you will need a CMYK ink colour. Inkscape does not allow saving under CMYK colour, so you’ll have to save it as Adobe RGB colour and use other tools to transform it to CMYK.
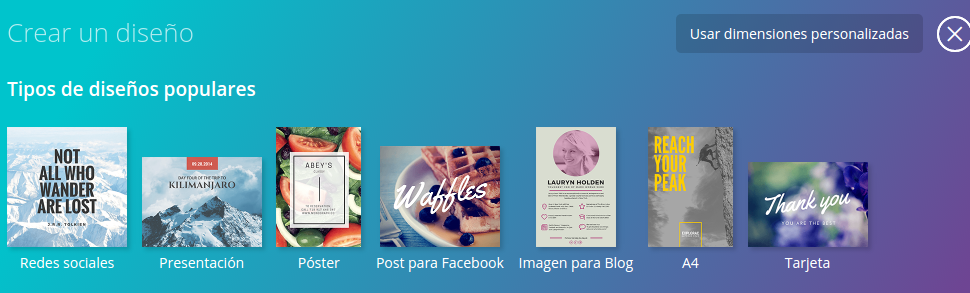
With Canva, when you start the application you’ll find many predefined formats. Some of these are quite interesting. If you wish to use a customized format, you must select the option Use customized dimension. Canva will then allow you to change the size of your poster. Regarding colour, Canva can export your work to a good-quality PDF format. This PDF will save your work in 300 DPI resolution and a RGB colour format. Using other tools you may export your work to a CMYK colour format.
4. Grids and reticules to keep elements tidy.
A poster usually has several graphic elements such as illustrations, photographs, text, lines or symbols. These elements are placed in different areas of the document to make up a composition that follows your graphic narrative of what you wish to communicate. Sometimes we need to tidy these elements so that they follow an order; that’s when grids and reticules come in handy.
Reticules are templates that are used to position and organise elements that are part of your graphic design. They are very important for the layout and help achieving a visual balance. Reticules help you to make your creative idea come to life in your work. Some designers do not like using reticules because they limit your creativity or the original idea behind a design. However, following the basic layout rules with a reticule can be useful to improve the design.
Reticules help respecting the separation margins between elements and the document separation margins. All margins must be the same; you cannot have the left margin of 1cm and the right margin of 0.5cm, as this would create and unbalance. Using reticules you can respect the margins.
Unfortunately, neither Inkscape nor Canva have a reticule creator. There are tools like Gridulator that will allow you to create a grid of reticules with a transparent background and to download it in PNG format. Then you can import the grid to Inkscape or Canva, and use it. With Inkscape, you can also add guidelines on the grid image, by dragging the pointer from the measuring bar and placing it on the columns of the background image.
5. Resources and images for your poster.
Once you have your sketch on paper and you’ve created the reticule to place your elements in order, now it’s time for you to start searching for, editing and creating these elements. This could be illustrations made by you, photographs under open licence, texts with free fonts. With the help of reticules you can organise your elements and respect the margins between them.
You can do this using the option File > Import on Inkscape and option Load in Canva. Both ways will allow you to import all the illustrations, backgrounds, photographs and other resources you may wish to use.
Regarding fonts, the Canva free version does not allow adding new fonts; you can only use the fonts that come with the tool. However, with Inkscape you can add all the fonts you like. Inkscape takes all the fonts installed on your operating system.
If you want to share your poster on advertising it on Facebook, you will need to create a specific version for this purpose. Read the Facebook Ads Guide to make sure you keep the right margins and text that is required. You can also check that you are within the text limitations using this tool.
With this resource you can find ways of getting photographs, illustrations, fonts and background images!
6. Now it’s time to publish the poster!
Your poster is ready, and so are your flyers, ads for Facebook, Twitter & Instagram. Now it’s time to publish your poster. Remember that if you’re going to print the poster, you probably want to convert it to a CMYK colour range!
If you want to publish on Facebook or Instagram, using paid ads you must use the Facebook adds tool, which will help define your goals and publish your poster. Twitter will also allow you to publish your event with paid ads.
If you don’t want to pay for ads, you can publish it organically. We recommend that you try using the different Community Manager tools that we’ve been describing on the Xarxanet portal.


Add new comment